Primer problems on the Load-Master are usually caused by the primer pin sticking up a small amount. To fix this problem you must determine what is causing the pin to not completely retract.
To solve these issues, start by removing the primer trough, looking into the carrier you will find a hexagon hole, on one of the corners of the hex there is a shelf to prevent the primer pin from dropping down too far. This shelf can become fouled with dirt, gunpowder, or case cleaning media. Clean this shelf of any foreign material.
If you have the old style Primer Trough (white or grey), remove the Trough Cover and carefully inspect the hole where the primer passes through. Remove any burrs on this hole with a sharp razor knife. Feel free to enlarge the hole to remove any burr. The hole does not provide guidance for the primer, but any burr will cause a potential tipped primer. Carefully inspect the Primer Slider for any nicks, burrs or flash and be certain you have the correct Slider for the primer size (small or large). It is recommended that you replace your old grey or white Trough primer feeders with the newer black
Small Primer Trough Assembly and/or red
Large Primer Trough Assembly.
Apply a VERY SMALL drop of oil to the black Primer Lever pivot. NEVER apply oil to any other part of the Primer Trough, Primer Pin or Shell Plate! Reinstall the Trough Cover and cycle the Primer Rocker and be sure the Primer Pin retracts completely.
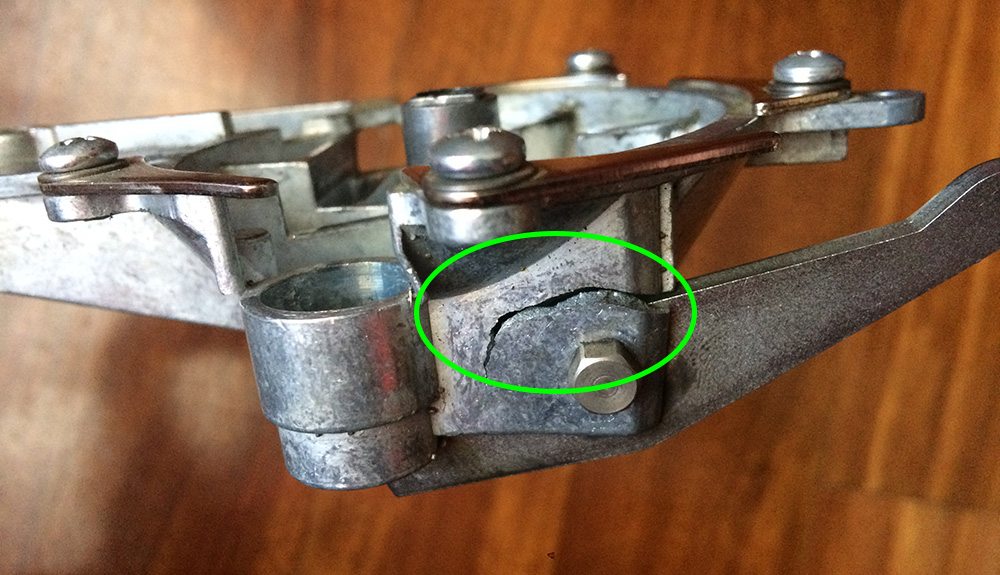
Now is a good time to check the Primer Seating Depth Bolt for proper adjustment. If the Primer Seating Depth Bolt is adjusted too deep, it may crack your Carrier (see photo above). The best way to adjust the primer seating depth is as follows:
First, make sure that the press is stopping on the stop built into the handle, not on one of the dies. You should adjust the sizing die so that it touches the shell plate when the ram is at the top of its stroke. Maintain a slight downward pressure on the lever while turning the sizing die into the turret, to prevent the die from lowering the carrier as you screw it in.
Next, place a fired case with the spent primer still in it in the primer seating station. Loosen the lock nut on the primer seating depth adjuster and turn the adjuster up until you run out of threads. Now raise the ram to the top of its stroke with the fired case in station #2. Holding the ram up with one hand, turn the primer seating depth adjuster down until you feel resistance. This will be when the primer seating pin contacts the spent primer in the case previously inserted into station #2. Lower the ram, and turn the primer seating depth adjuster down 1/6 - 1/3 more (one to two flats on the bolt head), and lock in position with the lock nut.
Check the wedge bar. It is located on the upper right rear of the press frame. Make certain that the bar is perfectly vertical and tight. It must not be able to wiggle. To ensure it is tight, remove the screw that secures the wedge bar. Remove the wedge bar. Now thread the screw in and out of the wedge bar repeatedly until the screw will turn in fully so that the underside of the screw head touches the top end of the wedge bar. Now reinstall the wedge bar and make sure the screw is tight.
One last helpful change is to place your sizing die in position 2 with its decapper removed. Put a
Universal Decapping Die #90292 in position one. This will align case perfectly to accept the primer.
